Showing posts with label crafts. Show all posts

Tuesday, July 1, 2014

A Day and Life in San Diego-Leroy and the Sea Lion Tour


In search of ocean breeze and sunny skies we headed downtown to a two hour San Diego Bay cruise.  One of the fastest and convenient methods to the city’s activities is to jump on the famous San Diego trolley. As with all public transportation you will meet people from different walks of life. Some are old, many young, well-dressed professionals, and others flocked together in families making their way to a game. 

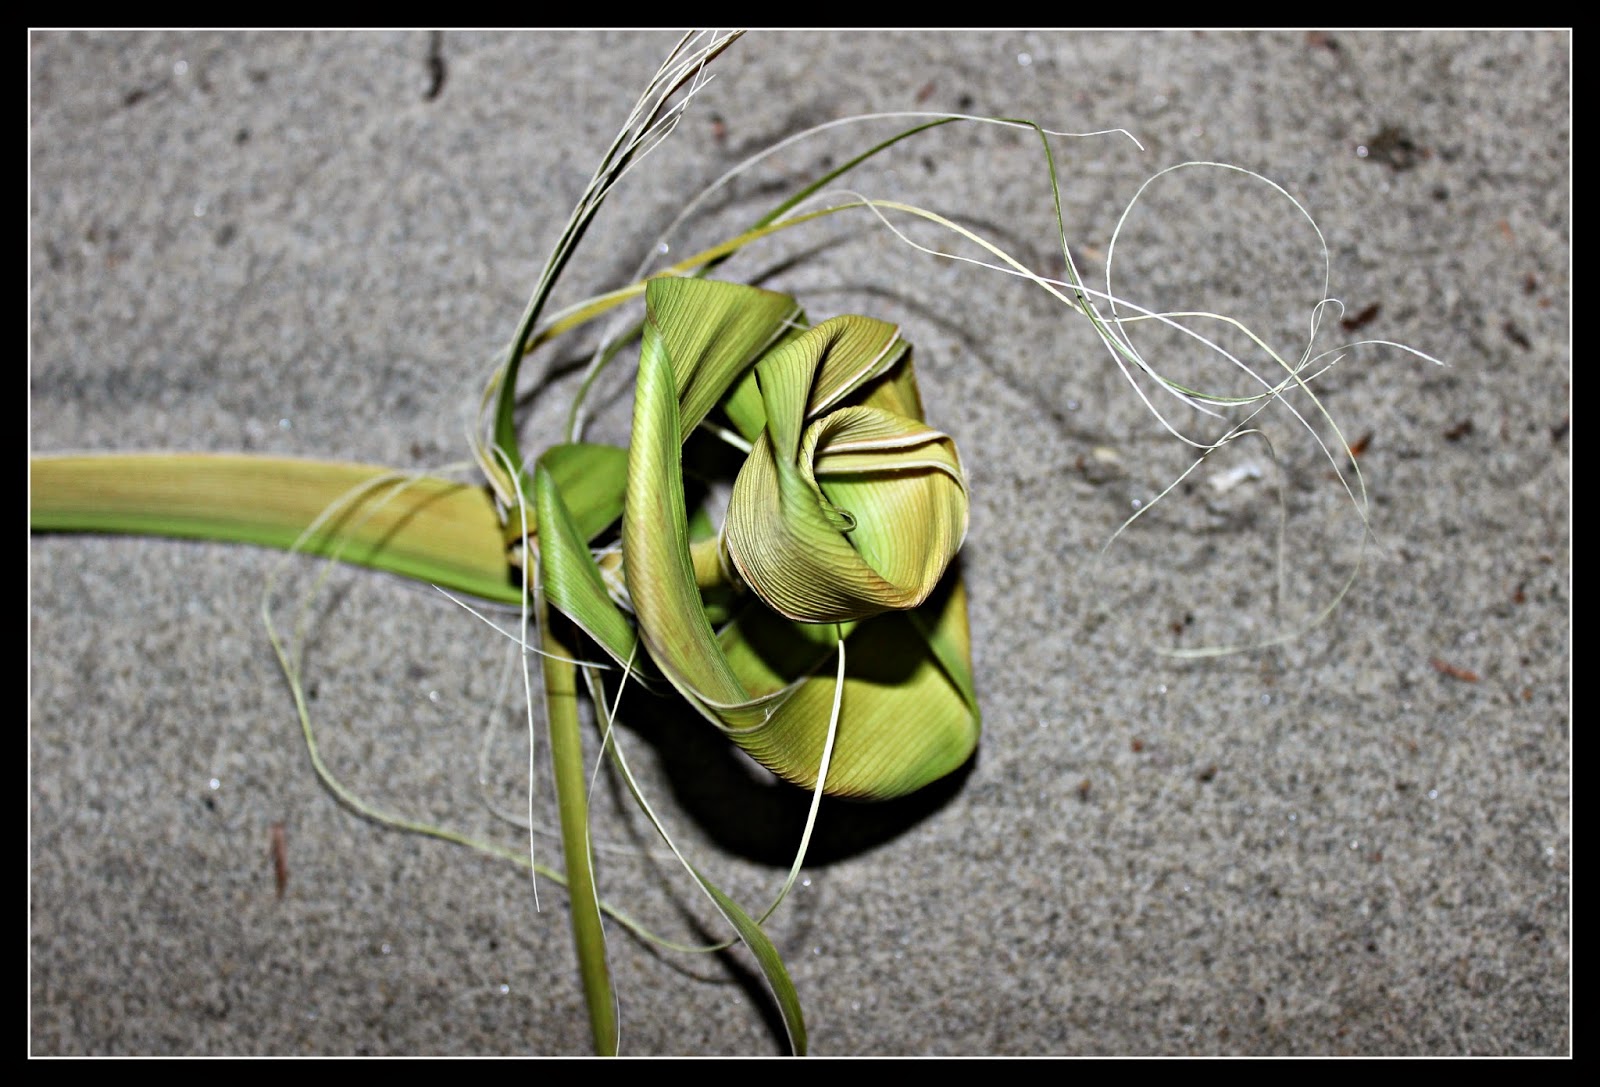
As we walked into the trolley we came across an Indiana Jones looking man sitting quietly assembling all types of flowers, animals, and creatures from palm leaves. With only a few seats available we were forced to sit near the street artist. Perhaps too close for comfort. In the back of my head I kept thinking, “I hope he doesn’t ask for change”.  I watched him suspiciously over the top of the chair.

This artist wasn’t just forging palm leaf products but also handing them out to anyone who took interest in his activities. Mothers, little girls, boys…he didn’t seem to care. He just sat diligently making flowers, occasionally looking up, and then reaching out to someone with a flower in hand. A gift without asking for anything!

I sat for a moment scanning his worn face, camouflage hat, half beard and his deep set eyes and wondered, “What is this man’s story?” It can be difficult to strike up a conversation with someone you know nothing about, let alone someone who looks as though they have one foot in homelessness and the other in the underemployed world. 

He seemed friendly enough so I swallowed my reservations and struck up a conversation. He promptly gave me a few palm leaf flowers as though to say “thank you” for noticing him.  It didn’t take much to get him talking. Just a simple question such as, “That’s really great…I should do that as a project. Where did you learn that?” For the next ten minutes we discussed his experiences, his search for a job, and of course where he learned the craft of palm art. 
 
Through the normal course of conversation we eventually came to the business prospects of his endeavors.  On more than a single occasion he earned $300+ from people who needed a batch for weddings and parties. He wanted to do more but was limited by the access to clients and the Internet. He can walk, talk, and make hundreds of flowers in a single day.

That got me thinking about how many other people in San Diego need jobs, a chance to use their skills, and an opportunity to find something meaningful to do. Leroy may be underemployed and his skills underutilized but he had the right spirit. If it was possible to get Leroy access to work opportunities, event planners, and wedding stores he might just have a chance to build a small but lucrative business to support himself.

The palm leaves cost him nothing, has no overhead, and can develop a cash business with no investment. He already has a backpack and a bag to store his product. His fingers work fine and his clothing is clean. Leroy didn’t appear much different than the rest of us except his face was a little tired, his grey hair pulled back into a pony tail, and he wasn’t exactly in the latest fashion. That of course depends on whether or not you like the outback style.  

After mentioning the idea Leroy’s eyes brightened and he began to elaborate on the many such stores he passes on his commutes that would have a need for his art. The flowers Leroy gives out for free are nothing compared to what he really can do. Like an artistic master he can weave bouquets, large flowers, species of flowers, picture frames, and a variety of animals. Perhaps, instead of giving them out on the trolley he can contact wedding stores and pass out samples, obtain orders, and share the profits with those who sell them to clients by the dozens. It is a made-to-order small batch production business.

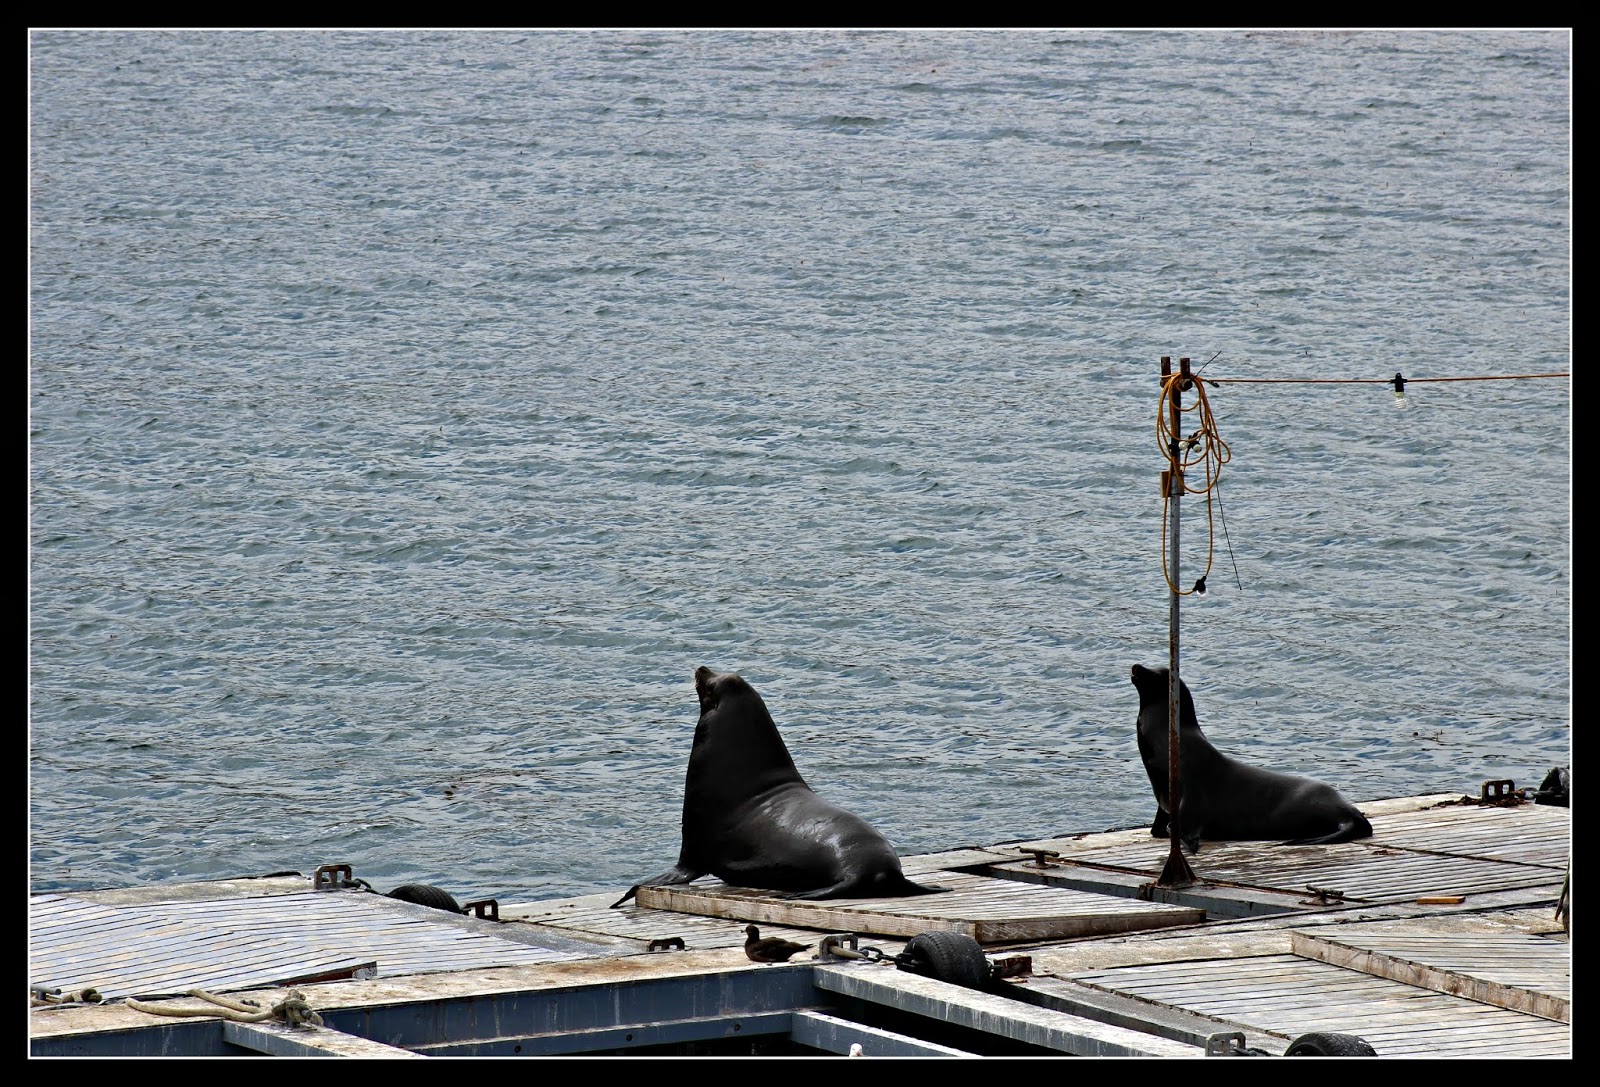
Perhaps you are more interested in the bay tour and where our final destination lay than the skills of Leroy. The tour is normally $120 for four people but we found a special price online for $70. The two hour trip took us in both directions around the harbor. You will sail near the Navy Base and all the way over to Point Loma. It comes in contact with sea lions, commercial fishing boats, military vessels and plenty of sail boats. 

It is hard to complain about taking a seat on the top of a cruise deck and watching the sites in San Diego Bay. The ocean air will cool you down and the California sun will give you a nice tan. You can lounge and have refreshments while learning about San Diego history.  The speaker will discuss some of the military ships and various historical landmarks. Plenty of tables on the deck and the cruise does well managing the crowd so there is ample room for everyone-everyone except Leroy.

We didn’t see Leroy on the way home. Perhaps he was busy giving samples to stores or alternatively crawled up under an overpass somewhere. He may still be busy giving out gifts to San Diego tourists and asking for nothing in return.  Something to brighten their day. He gave me a gift and I gave him an idea. I guess that is how a society works. Perhaps we can learn something from Leroy.

Friday, May 31, 2013

How to Build a Rock Garden Table


Sometimes we find old tables sitting around the house or a neighbor willing to part with a scratched up old piece of furniture for a few dollars. What is one man’s junk is another treasure. Learning how to refurnish such tables puts them back into beneficial use within one’s home or office. A little tender love and care can restore it to its former beauty.  The possibilities are as open as your imagination. 

Unpainted table
Finding a solid wooden table with a few scratches on it but in sound condition I decided it would be great for my patio. Yet as I finished painting it I decided that I could do just a little more to enhance it as an artistic project. A few ideas rolled around in my head such as building an actual pond, a sand based rock garden, or a nice habitat for hermit crabs. Finally I decided that it would be an excellent place to put the portable Weber Grill. 

Edging
As you can tell from the pictures the center is made of rocks, sand and shells. It looks wet but is as solid as glass. This means you can turn the table upside down, move it, and still not have a mess. There are many different options when turning an old wood table into an art project. Consider all of the options such as a smaller rock garden in the center for a vase or creating a slim rock garden edging on three sides to give it an artistic yet functional development.

Step 1: Make sure the table is pure wood without laminated tops or chip board construction. Check the structural soundness of the table to make sure it is worth your time. 

Step 2: Lightly sand the surface to create a slightly rougher texture to hold the paint. This is important if the top has a clear coat on it. If you desire to varnish the table you will need to strip and sand. You will want to remove or fill all the scratches. 

Step 3: Paint or varnish the table. It may be necessary to do this more than one time to ensure consistency of color and depth. 

Step 4: Measure out how large or small you desire to make your rock garden. Use these measurements to purchase and cut half inch or quarter inch boards. The size and thickness of the edging is up to your personal preference. 

Step 5: Use wood glue and thin nails to attach the four sides to the top of the table. It is important that you use glue as it will secure the wood properly and avoid any leakage when the clear coat is applied. Paint the stripping to match the table once they are attached.

Step 6: Pour sand, rocks, and little shells between the attached edging boards. The type of items you use within this area is up to you. Some considerations could be simply sparkles, shells, glass gems, balls, or anything else of interest. You can find these items at any craft store. Make sure they are arranged and spread out to cover the bottom of the table.

Step 7: Pour the epoxy clear coat over the items you placed between the edging boards.  The directions state it will be completely cured within 72 hours. This may work for a thin layer but when that layer is an inch thick it could take up to a week or more. 

Dry Rock Garden
The end result should be a table that is painted and has a decorative style. It is possible to make many variations on this table. My goal was to create a wet looking pond on the table where a Weber grill, plants or pictures can be placed. Depending on the layer of epoxy clear coat you can create a smooth top or one in which the rocks sit above the coating. It draws some level of interest as people naturally go over and touch the rock garden to see if it is full of water. A second round of this might come out more as a table with a higher but less wide place for potted plants. If you are interested in purchasing this table please send me an email.

Expenses:
Table Free
Epoxy clear coat $27 X 2
Edging wood $4
Paint $4
Rocks, Sand, Shells $8 (You can get this for free)
Total $70

Monday, May 13, 2013

How to Build an Old Crate Bookshelf


Arts, crafts and hobbies can be a wonderful addition to any person’s life. They provide an outlet for creative juices, allow for personal expression, enhance skills and give one a sense of accomplishment. With all such creative endeavors it is a process of learning. Things rarely turn out perfect but do provide some insight into how to make the next one better or allow for the transference of skills to other areas. This post is about how to build a bookshelf from two crates and a few pieces of wood. 

The process is relatively simple and can be done in any small space. With a garage and proper equipment it is possible to do much more in terms of creative and more professional works. However, with just about any size space you can put together something simple like this bookshelf with whatever color or design you prefer. 

The bookshelf is very steady and I was actually able to lift it full of books without any problems with the joints, bindings, or any other type of loosening. This strength is a benefit because it is possible to put heavier stuff on the shelves without worrying about potential damage. You should have no problem with heavy books. 

Step 1: Find and paint (or sand and stain) two crates. You may find these for free or purchase them. 

Step 2: Cut four 1”X 2” boards (2 on either side) to the length of the two crates, a center shelf area, and 4” for the legs.

Step 3: Paint the rest of the shelf. I found it easier to have all the parts painted before adding them. You may paint or place designs on the side to make it more decorative. 

Step 4: If you haven't done so assemble your boards to the two crates. You should use a proper screw to create appropriate strength. Nails are likely to pull out.

Step 5: Add cut potato bag or other cloth to the sides. It isn’t a necessary step but you might want to complete it to create a more decorative look. 

Step 6: Place a felt shoe, wheels, or wrapping on the bottom of the legs to avoid scratching the floor or other surfaces. 

You are done!

The total cost is approximately $47 assuming you bought all of the items. If you found your own crates it would tally out to under $25.

$12X2 Crates
$5 for two boards cut into four pieces.
$5 paint
$5 sprays to make it shinny (not necessary if you want an antique look).
$3 shoe or felt bottom
$5 potato bag

Cost Comparison: Browsing the Internet you can find a number of similar examples but nothing I found was exactly the same. Such products run for $120 to $250 depending on the size and quality of the crates. I have seen some large and well done one's for $800. In many cases these crates have been refurbished to create a rustic look. You will have to include shipping as well. If you can get away with this simple design for $25 you have done well (just find your crates).

I'm thinking of selling this one so send me an email with an offer if you are are interested. I would like to work on something else. muradabel@gmail.com