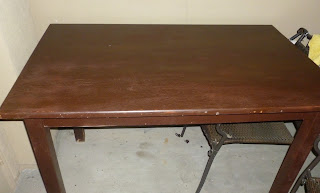
Sometimes we find old tables sitting around the house or a
neighbor willing to part with a scratched up old piece of furniture for a few
dollars. What is one man’s junk is another treasure. Learning how to refurnish
such tables puts them back into beneficial use within one’s home or office. A
little tender love and care can restore it to its former beauty. The possibilities are as open as your
imagination.
 |
| Unpainted table |
Finding a solid wooden table with a few scratches on it but
in sound condition I decided it would be great for my patio. Yet as I finished
painting it I decided that I could do just a little more to enhance it as an
artistic project. A few ideas rolled around in my head such as building an
actual pond, a sand based rock garden, or a nice habitat for hermit crabs.
Finally I decided that it would be an excellent place to put the portable Weber
Grill.
 |
| Edging |
As you can tell from the pictures the center is made of
rocks, sand and shells. It looks wet but is as solid as glass. This means you
can turn the table upside down, move it, and still not have a mess. There are
many different options when turning an old wood table into an art project.
Consider all of the options such as a smaller rock garden in the center for a
vase or creating a slim rock garden edging on three sides to give it an artistic
yet functional development.
Step 1: Make sure
the table is pure wood without laminated tops or chip board construction. Check
the structural soundness of the table to make sure it is worth your time.
Step 2: Lightly
sand the surface to create a slightly rougher texture to hold the paint. This
is important if the top has a clear coat on it. If you desire to varnish the
table you will need to strip and sand. You will want to remove or fill all the
scratches.
Step 3: Paint or
varnish the table. It may be necessary to do this more than one time to ensure
consistency of color and depth.
Step 4: Measure
out how large or small you desire to make your rock garden. Use these
measurements to purchase and cut half inch or quarter inch boards. The size and
thickness of the edging is up to your personal preference.
Step 5: Use wood
glue and thin nails to attach the four sides to the top of the table. It is
important that you use glue as it will secure the wood properly and avoid any
leakage when the clear coat is applied. Paint the stripping to match the table
once they are attached.
Step 6: Pour
sand, rocks, and little shells between the attached edging boards. The type of
items you use within this area is up to you. Some considerations could be
simply sparkles, shells, glass gems, balls, or anything else of interest. You can find these
items at any craft store. Make sure they are arranged and spread out to cover the bottom of the table.
Step 7: Pour the
epoxy clear coat over the items you placed between the edging boards. The directions state it will be completely cured
within 72 hours. This may work for a thin layer but when that layer is an inch
thick it could take up to a week or more.
 |
| Dry Rock Garden |
The end result should be a table that is painted and has a
decorative style. It is possible to make many variations on this table. My goal
was to create a wet looking pond on the table where a Weber grill, plants or
pictures can be placed. Depending on the layer of epoxy clear coat you can
create a smooth top or one in which the rocks sit above the coating. It draws
some level of interest as people naturally go over and touch the rock garden to
see if it is full of water. A second round of this might come out more as a table with a higher but less wide place for potted plants. If you are interested in purchasing this table
please send me an email.
Expenses:
Table Free
Epoxy clear coat $27 X 2
Edging wood $4
Paint $4
Rocks, Sand, Shells $8 (You can get this for free)
Total $70
No comments:
Post a Comment